

Hi, all! Welp, Monday is over, so we can all breathe a sigh of relief. Yesterday wasn’t too shabby, although the nugget had a migraine. The poor guy has inherited them from me, just as I inherited them from my mom. I just pray he doesn’t inherit my other physical ailments. Okay, now that I’ve gotten you all bummed out, lol, let’s hit the polish!
I have wanted to do a red galaxy for some time. I’ve seen plenty of purple, pink and blue ones (as I have done), and some pretty cool pastel ones. I honestly don’t remember seeing a red one, but I’m sure it’s been done already. Here is mine-

Red Galaxy mani
First of all, let me rattle off the polishes I used! Oranges and reds are mostly Zoyas- Nadia and Tawny from the Party Girls collex and Blair. The other red I used was Red Blood Sells by Octopus Party Nail Lacquer. The base is yesterday’s polish I reviewed from OPNL, which is Favourite Worst Nightmare. The yellow I used is Stone of the Mind by Lucky 13 Lacquer. I also used their matte top coat, We’re All Matte Here. Finally, the white I used under the colors to make them pop over the black is Whipped Frosting, a matte polish by Sinful Colors from their Kandee Johnson collab.
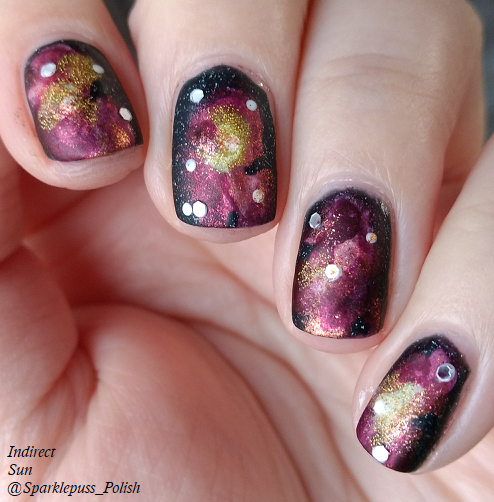
Red Galaxy Mani
For those of you that don’t know how to do a galaxy mani, let me explain. The rest of you can skip this paragraph. You want to have a dark color as your base for a space-y look. Next you tear little pieces off of a make up wedge. You are going to make as many little pieces as there are polishes. Holding the piece with tweezers, you first want to dip the piece lightly in the white. It’s better to use it sparingly, because it’s easier to add more than to take it off. Use inspiration pics to help you figure out the shape of your galaxy. It can be done quite haphazardly and still turn out really good! That white is not going to stay white! Next you’ll want to use the main color of your galaxy. Dab it all over the white. Next you want to use your darker colors, dabbing them around the edges. You honestly probably only need 3 colors for the galaxy, but the more you use, the more realistic your galaxy will look. After that, I added some more white to the center and dabbed the lightest color. I then used a toothpick to add white stars and some silver glitter as stars. To make the shape of the galaxy seem more random, I added some more black in various spots at the edges of my galaxies. While this may sound complex, you’re simply dabbing colors onto your nail. I have no artistic skill whatsoever when it comes to drawing art on my nails. Something like this is waaaay easier for me to do!

Red Galaxy Mani
So what do you guys think? Did I pull this off or no? I think it looks okay. I wish my stars had turned out smaller, like I thought they would with a toothpick. It’s still not so bad. If you’re wanting to try this and my paragraph on how-to was confusing, just go to Youtube and search Galaxy Nails Tutorial and someone will explain better than me!
Thanks for stopping by today!

Not seen a red galaxy mani before and yours is amazing ♡
LikeLiked by 1 person
Thank you! 😊
LikeLike
It’s so autumnal! I wanted to do an orange one for Halloween but time was like Nope! I love mixing up galaxy colors.
LikeLiked by 1 person
This is stunning! I love it.
LikeLiked by 1 person
Stunning! I love the matte effect too.
LikeLiked by 1 person
You are so talented. If I tried that, it would look nothing like yours 🙂
LikeLiked by 1 person
Aww, thank you so much!
LikeLiked by 1 person